Flavour Pairing: Pomegranate Molasses Tilapia Tacos with Kielbasa Fennel Salsa

IMG_2768Pomegranate Molasses Tilapia Tacos with Fennel Kielbasa Salsa bite

I tend to get my culinary resourcefulness from what surrounds me, so I like to keep my kitchen full of diverse and inspirational ingredients. When I begin a cooking endeavor, I get out everything I feel might pique my creativity and sort through the combinations until I get a flash of genius. I must say, I am proud of this recipe.

Pomegranate Molasses Tilapia Tacos with Fennel Kielbasa Salsa 2

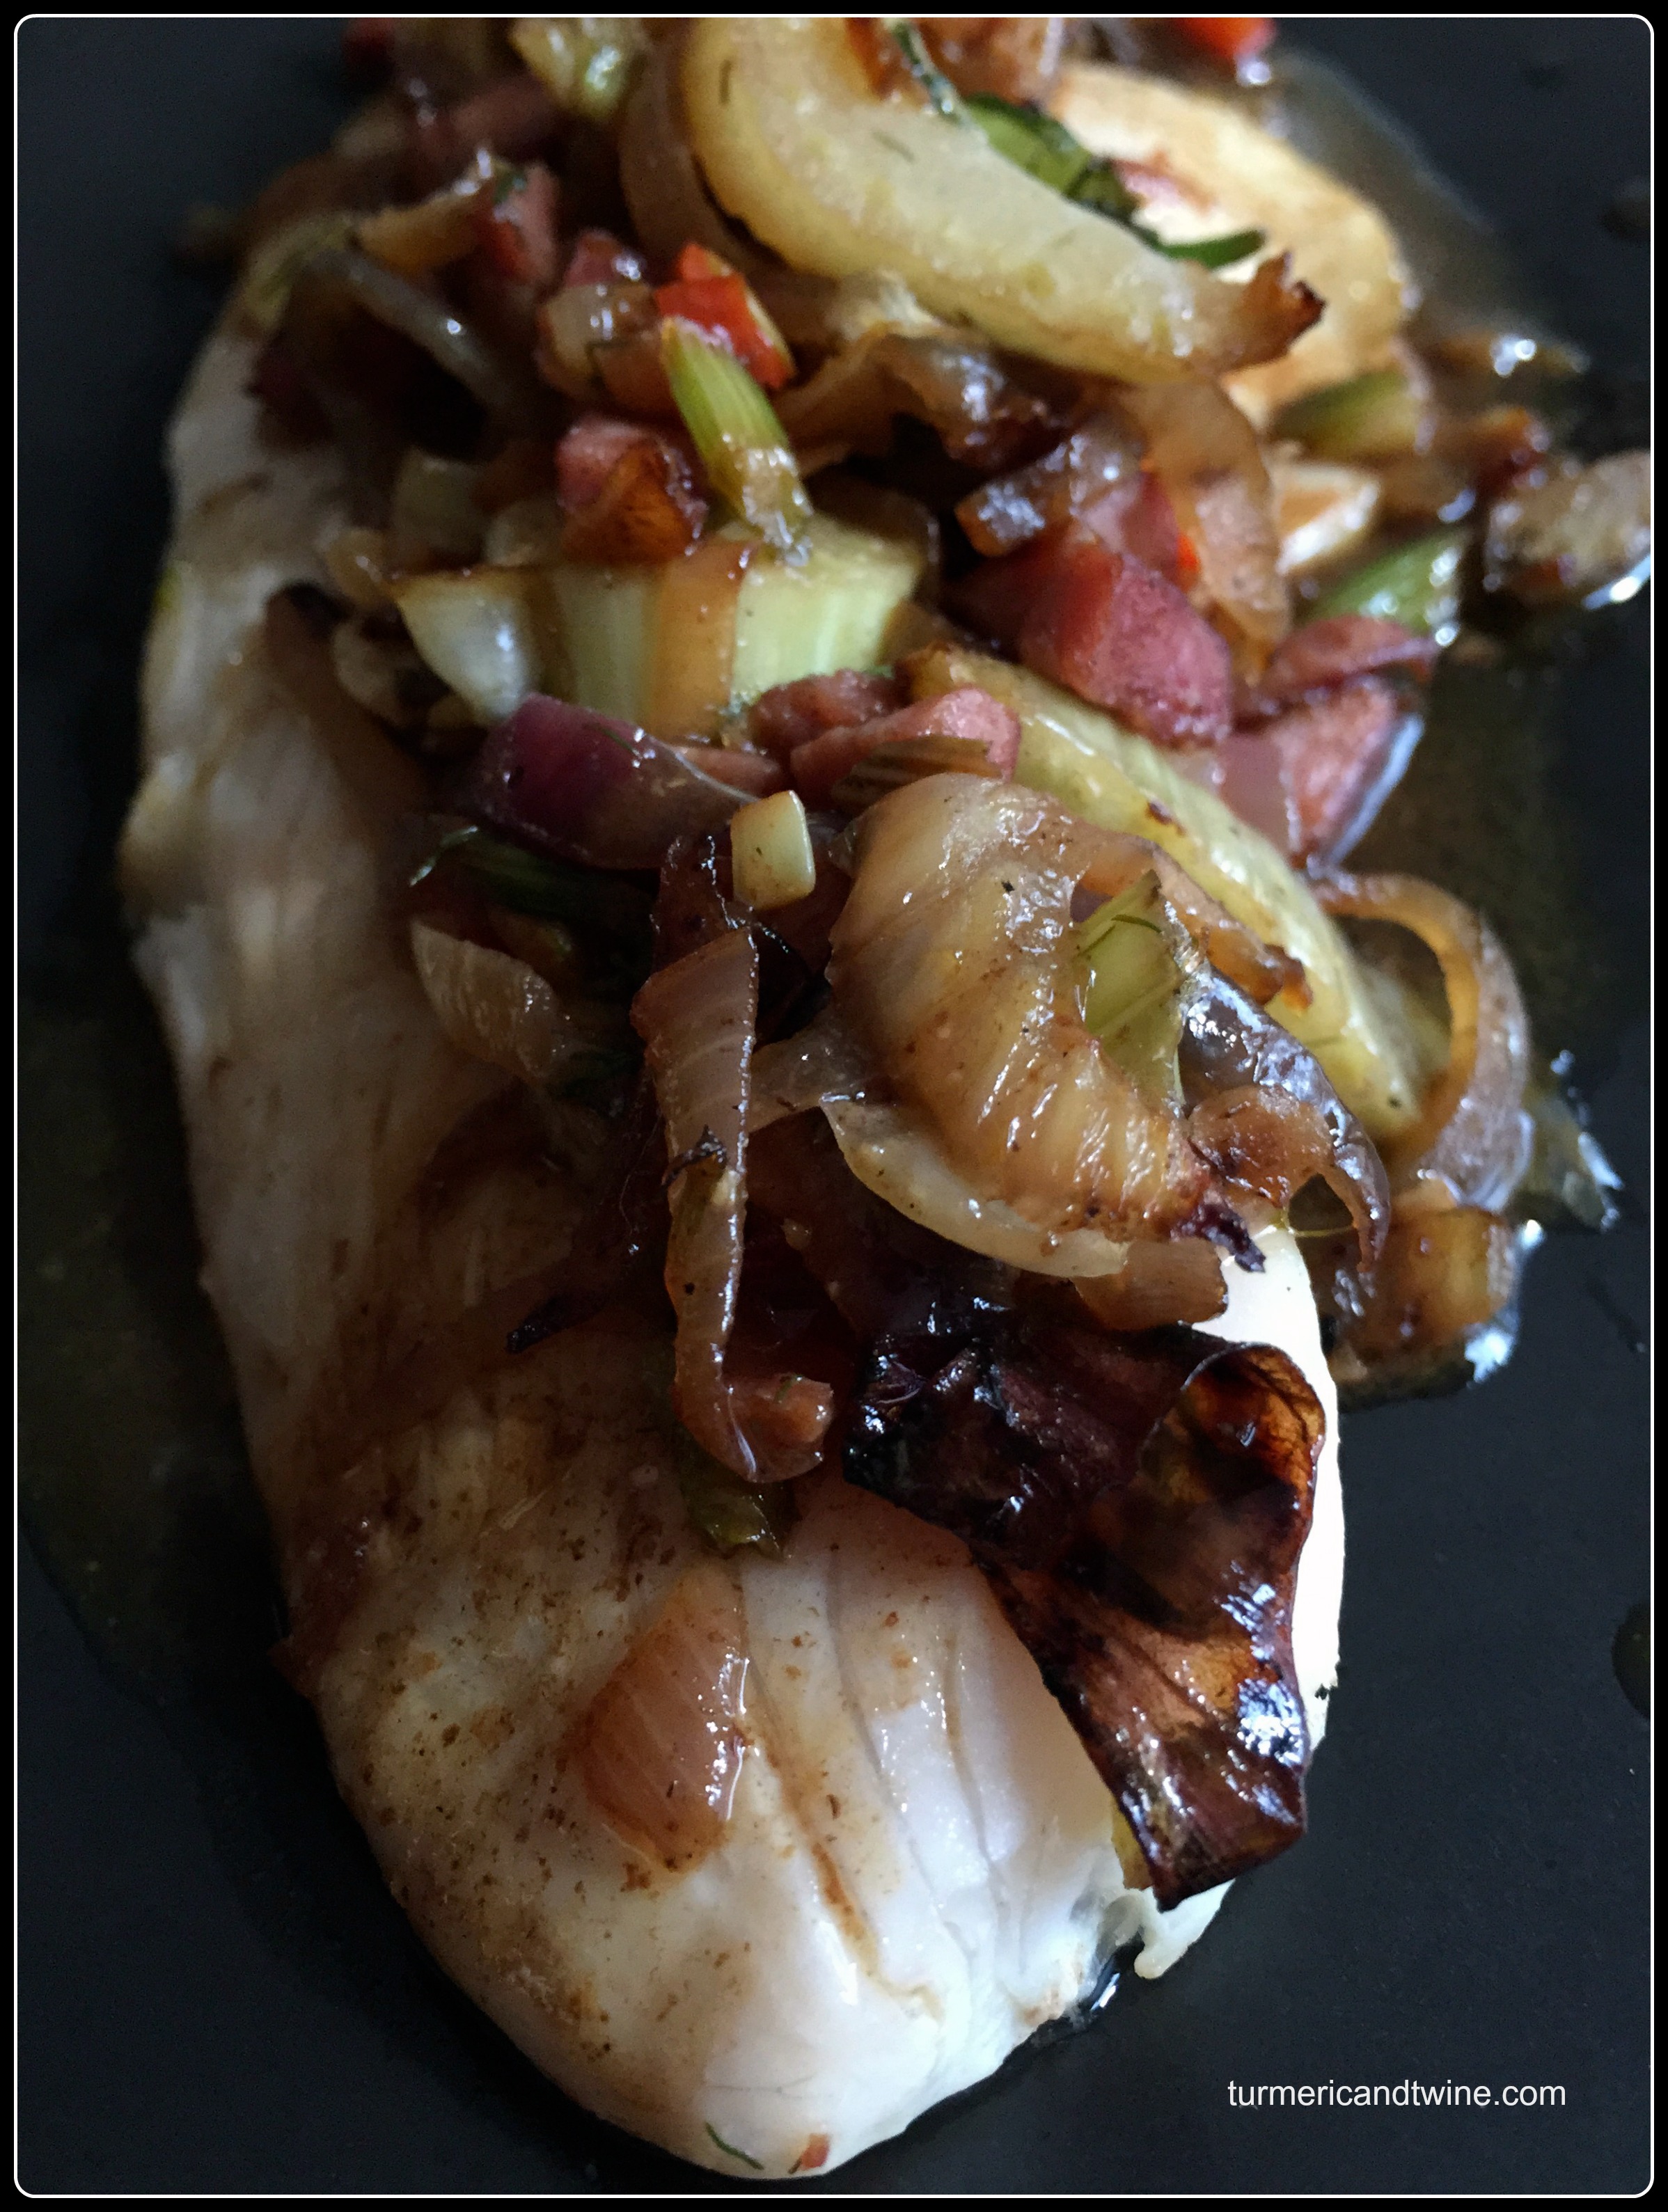
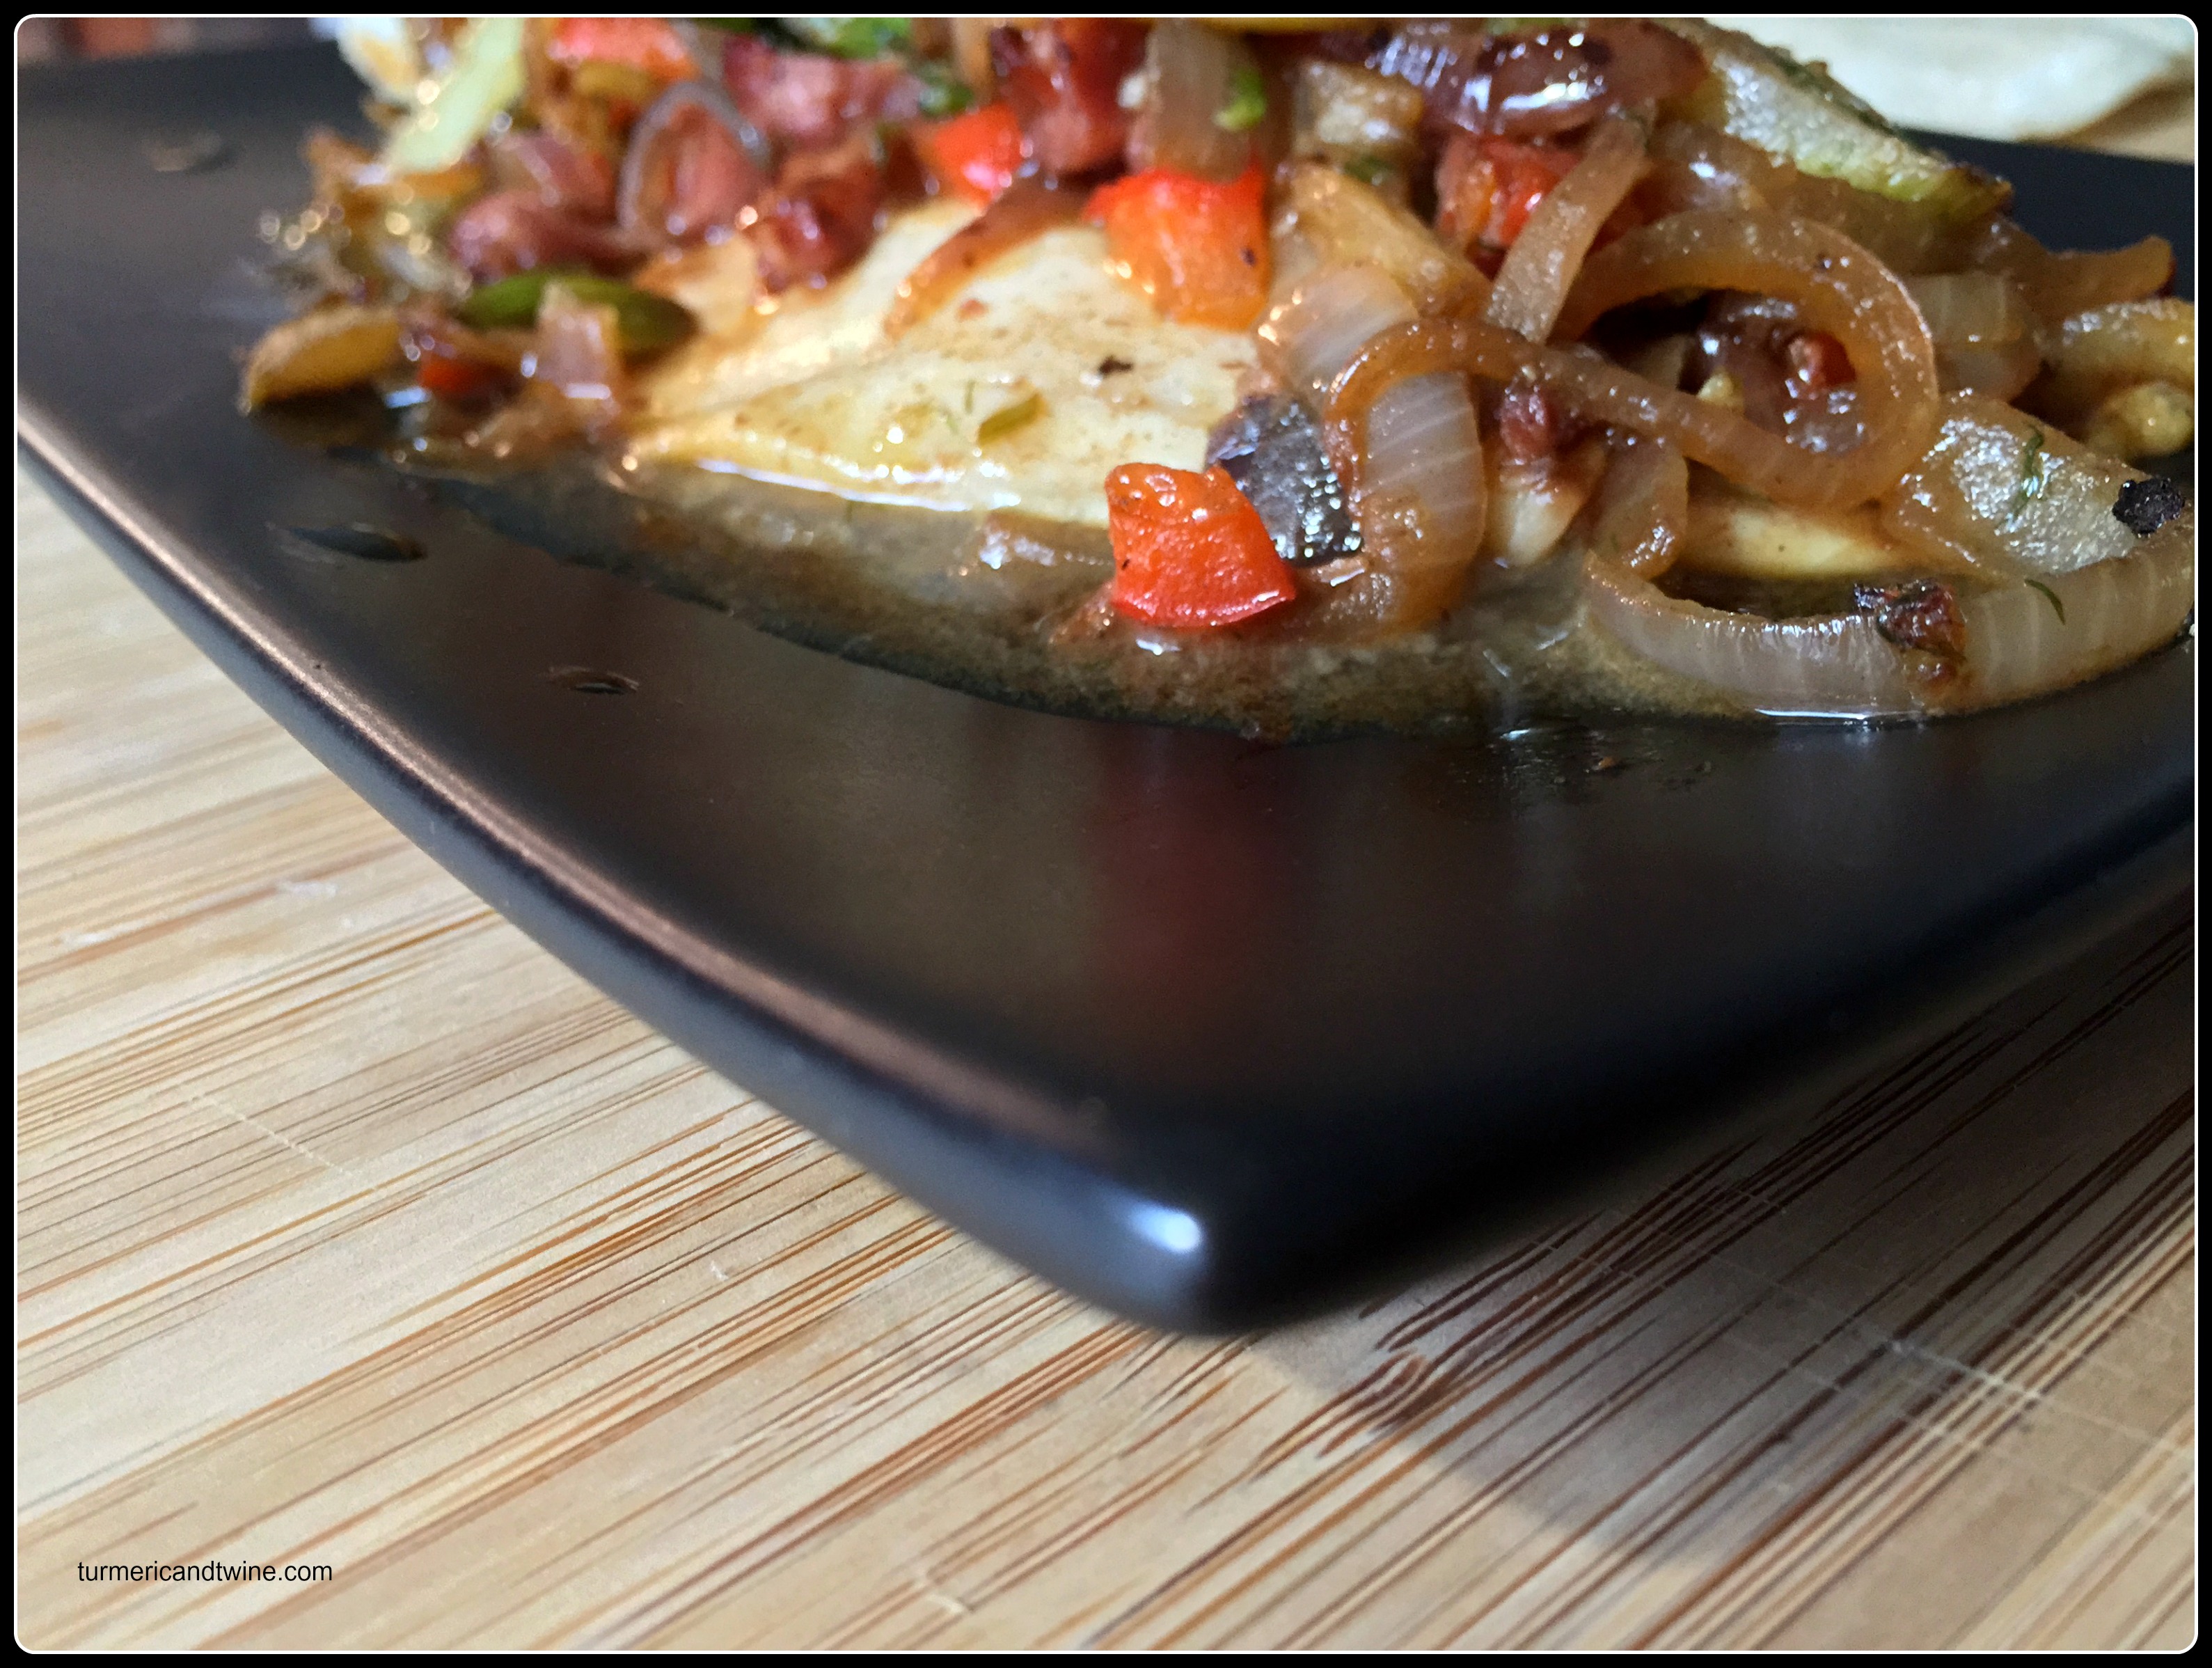
Tilapia has a mild, almost sweet flavour and a delicate texture. It is like a slightly fishy canvas that absorbs whatever you put on it. Pomegranate molasses is the base of the marinade for the tilapia and it adds so much to the complexity of the dish. Fennel and kielbasa add the right combination of crisp and meat to make the perfect salsa atop a bitable taco.

 Pomegranate Molasses Tilapia Tacos with Fennel Kielbasa Salsa plate

Pomegranate molasses is one of those miracle condiments that compliments everything. It is made by boiling pomegranate juice into a thick, sweet reduction and retains its tart qualities as well. Dark and almost black with a reddish hue, pomegranate molasses hails from Mediterranean and Middle Eastern cuisine. It is typically used in marinades for fish and meat, included in sauces and used as syrup for drinks and desserts.

pomegranate molasses tilapia with fennel kielbasa salsa

I came across a bottle of it when I visited one of my best friends in Toronto last summer. We entered a well-known Middle Eastern establishment in Kensington Market that sells falafel, Turkish delights and various Mediterranean staples. I was instantly intoxicated by the place. While browsing the shelves, I zeroed in on the bottles of pomegranate molasses and asked what it was used for. The vendor said “all the things.” I’ve been using it ever since. I doubt it is available at any supermarket around where I live now, but can certainly be found online. I think next time I will try making it myself.

 Pomegranate molasses marinated tilapia tacos with fennel kielbasa salsa

Pomegranate Molasses Tilapia Tacos with Kielbasa Fennel Salsa

Serves 4-6

Ingredients

  • For the fish:
  • 2 tilapia filets
  • 2 teaspoons pomegranate molasses
  • dash olive oil
  • 1/8 teaspoon sea salt
  •  For the salsa:
  • ½ a bulb of fresh, thinly sliced and roughly chopped fennel
  • 3-4 inches of kielbasa, diced
  • ½ of a red bell pepper, deseeded and diced
  • 1 chopped red onion
  • 4 cloves of chopped garlic
  • ½ a lemon
  • pinch of salt
  • cooking oil

Directions

Clean and prepare the filets. Place them in a baking pan and sprinkle sea salt all around them. Spoon a teaspoon of pomegranate molasses down the middle of each filet and drizzle olive oil on each. Set aside to marinade.

Start preparing your ingredients for the salsa. Preheat oven at 400ºF/200ºC/Gas mark 6.

On medium heat, brown the onion and garlic on the stovetop in some cooking oil. Stir intermittently.

Add the fennel. Cook until soft then add the bell pepper and kielbasa. Sprinkle salt to taste. After 3-4 more minutes, remove from heat.

Lay the salsa abed the tilapia. The filets should be buried underneath the colourful spread. Squeeze the lemon on top the contents.

Place the pan into a fully heated oven and bake for 8-10 minutes. Remove when the tilapia is opaque. Do not overcook or fish will lose its tenderness and be rubbery.

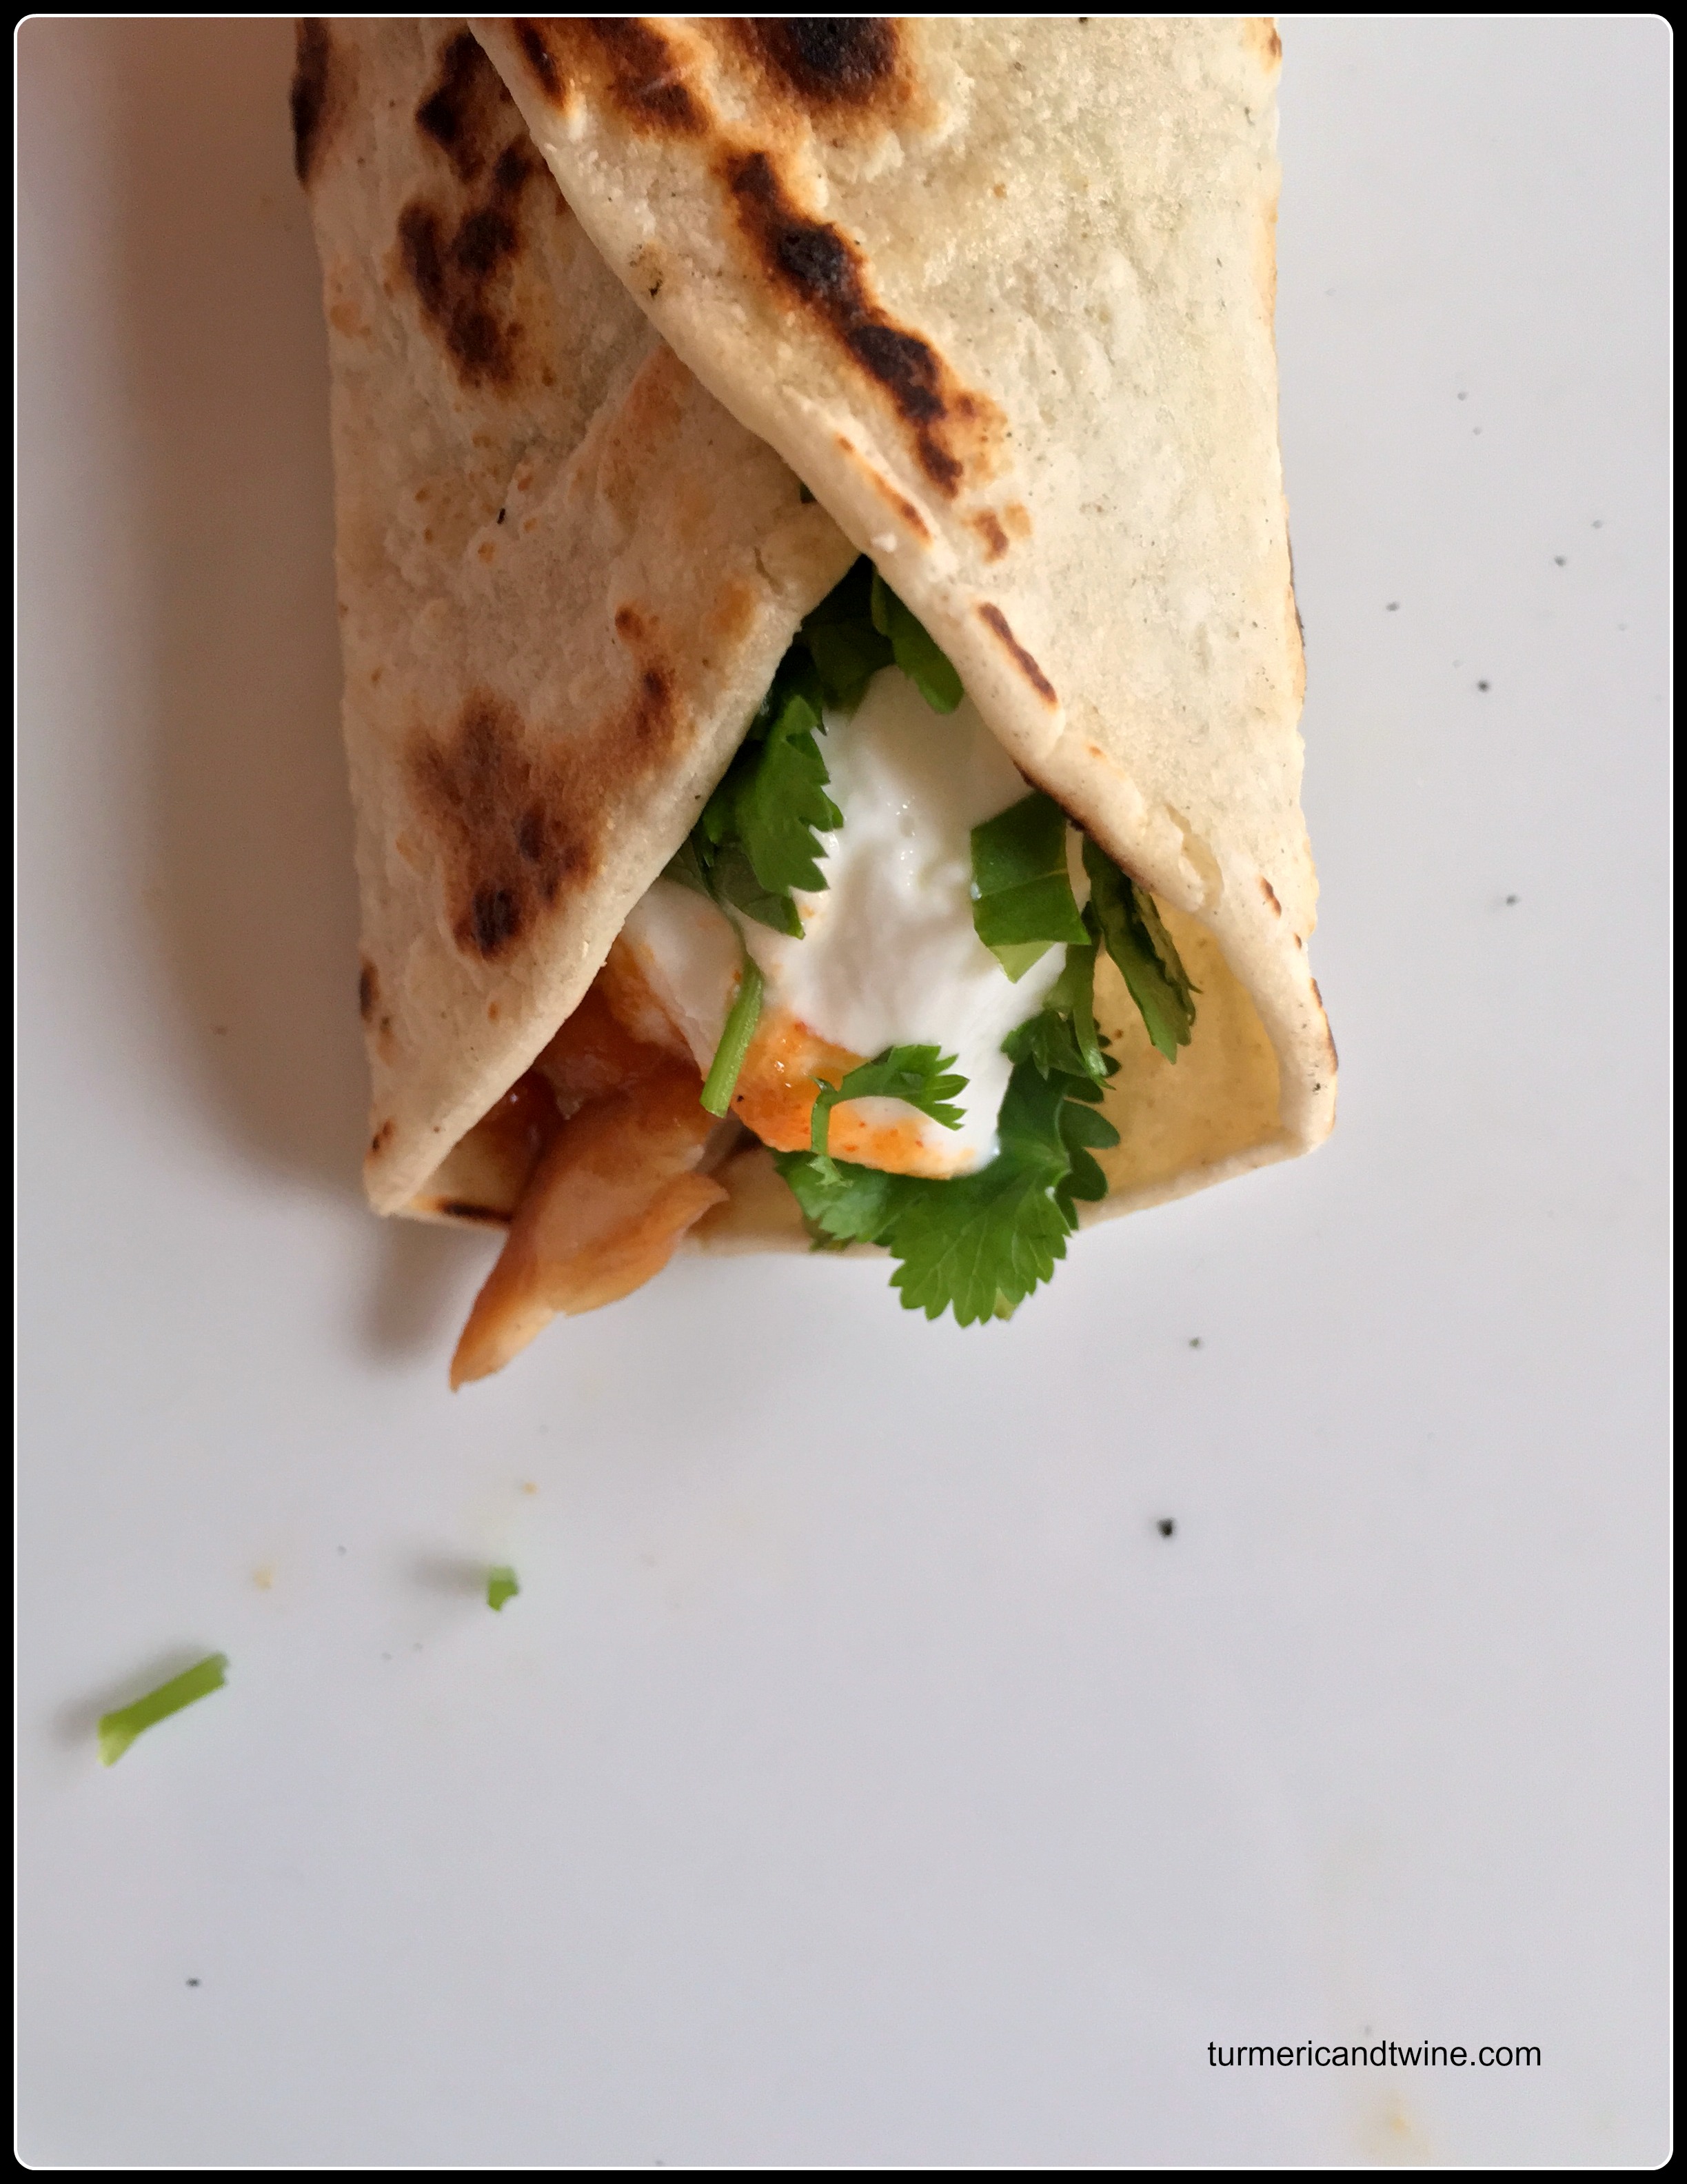
Heat corn tortillas in a clean stovetop pan. Each side should have pleasing burn marks and some bubbling.

On each tortilla, break-up a fork full of tilapia and scoop some of the salsa and its juice.

Top with goat chevre or greek yogurt and chopped cilantro. Dip in your favourite hot sauce.

Devour. Savour. Enjoy the complexities delicacies of flavour and be astonished by what you just made.

Experimenting with Dumplings + Musings On Time

 vegetarian dumplings 1.jpg

I’ve come to a place in my life where I realize how precious time is. I wish I had more of it. I wish I hadn’t wasted so much time in my youth on… being young. Wandering aimlessly. Thinking about various paths to take with my life and not committing to anything in particular besides living. It is, at times, difficult to avoid overwhelming myself with big questions and demands. “Why didn’t you just go for it?” my brave self says. “Why did you go for it?” my careful self says.  Honestly, how do we not tear ourselves to shreds everyday? Damn you, self-reflection.

 handmade mushroom dumplings detail

Though, I know time is never really wasted. Not really. One of the self-preservation guidelines I have acquired over my 34 years is to live life without regret. No regret for my actions or inactions. Think carefully, but not too carefully. Pick your battles, but don’t let yourself be pushed around. Cut your losses when you need to, but stand firm at other times. Focus your energy on what makes you feel good and productive. As a youth, people generally terrified me. The amount of times I wish I’d said/did something but didn’t is uncountable and I lived with the regret of it. I lived with it… until I didn’t. There was a moment in my life where I understood that regret is the most wasteful emotion in existence. Ain’t nobody got time for that.


I’m a little embarrassed to admit this, but it was actually after watching Brokeback Mountain that I decided to kick regret out of my life. I literally cried for two weeks- everyday, all day -after watching that film. It is a story of a character’s lifelong regret and it gave a very brutal, very lonely idea of what it took from him. It destroyed me. I felt like I was mourning the loss of time. All the time that I had dwelled on things that didn’t help me or hadn’t made the best of a situation. Why had I let my insecurities ever get the best of me? Why have I let my fears take control? I have a body and a mind. Use them! Go! Do! Be! I cried and cried and when I finished crying, I was done and have been ever since. Luckily, regret is just a state of mind. I still do dumb things, but just don’t regret them. Instead, I learn from them and take notes on how do it better next time. I suppose time has had a hand in that.

mostly vegetarian mushroom dumplings filling

I greatly enjoy wrapped things as well as the act of wrapping things. Wrapped things contain presents, surprises to discover. I take any opportunity to wrap things, especially food. Mandu, or dumplings, are so fun. I bought some mandu wraps recently and gave my first attempt at making those mini pockets of delight. I often see Mandu Masters working their magic on each specimen, making them perfectly uniform every time and with incredible speed and efficiency. I bow down to these masters.

Some discoveries from my first few attempts:

  • It is challenging to prevent the mandu from looking like deformed ears.
  • It is fun to eat the ones you mess up.
  • You can fill your mandu with pretty much whatever you want, as long as it is viscous enough.


Mandu wraps can be found in the refrigerator section of just about any market or supermarket in Korea. If you do not reside in Korea/Asia nor have a market that provides these wraps, they can be made easily with a little flour and water. I may try a more traditional filling recipe someday, but for now, experimenting is too much fun.

Here is the recipe I made most recently.

vegetarian dumplings.jpg

Vegetarian Mandu and Dipping Sauce


Ingredients

  • 1 package of mandu wraps (containing 20-30 wraps)
  • 2 cups of cooked rice, rice noodles or your starch of choice
  • 1 block of firm tofu
  • celery tops and leaves from one bunch, chopped
  • 8-10 cloves of garlic, chopped
  • 3 chili peppers, chopped
  • 1 onion, chopped
  • ½ teaspoon salt

Directions

Heat a stovetop fry pan and pour in a dash of cooking oil over medium high heat. Cook the chopped garlic, chilies and onions for a few minutes until translucent and slightly brown. Then, add the chopped celery. Cook until the celery is tender. Once cooled, blend this mixture until viscous. Set aside in a bowl.

If using rice noodles or any longer noodles, be sure to break or cut them before adding to the filling mixture. This is to prevent difficulty in closing up the mandu properly. If using rice, simply add to the mixture.

Heat your stovetop pan once again with oil on medium high heat. Crumble the tofu by hand directly into the pan and cook for 5-10 minutes or until slightly brown. Add the tofu to the rest of the filling mixture along with the salt. Mix.

Prepare a steamer with water and heat until boiling.

Now for the fun part: filling the wraps. Place a heaping teaspoon of filling into the center of each wrap. Fold one side over and roll the wrap into a log shape. Pinch the ends closed and wrap them around until they touch on one side. Wet your fingers and pinch together until closed. Place them in the steamer and steam for 7-10 minutes.

Your mandu can be eaten at this stage, but I highly recommend a further step of a light pan-frying. This makes your mandu extra delicious. Simply, heat a little oil in a pan and fry the mandu on each side for about 2-3 minutes.

For the sauce, my method is fool proof and delicious: one part soy sauce, one part white or apple cider vinegar and a pinch of chili powder.

Dip your lopsided, ear-shaped mandu lovingly into the sauce. Laugh about how each one will help you hear better and devour ruthlessly.

Molecular Gastronomy: Honey Wrap and My Dada

honey wrap: you are too sexy

Today is my father’s birthday. He would be 68. Were he alive, we’d probably celebrate by preparing him breakfast in bed, going to see a movie and taking him out to dinner. If he had it his way, we’d all go sailing (the rest of the family would probably protest the temperature, being November and all). In the spring of 2010, my parents moved back to the Abode after nearly 30 years away. They had plans to build a house on the land they had bought, but after a few days, it was clear that dream wouldn’t be possible.

Sid the Sailor. On a boat, dad was at his best.


My father, Sid Smallen; handyman extraordinaire, Sufi mystic, master woodworker and all around awesome guy, was struck on his back by a falling tree and paralyzed from the chest down. He sustained many other internal injuries, and after being helicoptered to the ER, we weren’t sure he would make it. For 10 months, he lived through one crisis after another; heart attack, appendicitis he couldn’t feel, not being able to eat, having to relearn how to breathe without aid, kidney failure, bedsores and at times not being able to talk due to the placement of his tracheotomy. He was moved to a rehabilitation hospital, and over those 10 months, he was never strong enough to leave it. Sometimes he was so filled with drive and energy that he was rockin’ his rehab exercises, sometimes infection and fatigue made it too difficult for him to lift his head. Finally, after being in a septic coma for 2 weeks, my father passed away peacefully, surrounded by loved ones and so much love on April 24th, 2011.

 226578_10150226778774155_5663681_n

Before the accident and as far back as I can remember, my dad was always doing something. He was an excellent tinkerer and could pretty much make whatever he put his mind to. He made most of the furniture in my mum’s home and built a house-sized, 3-story addition to a previous house we lived in. I don’t think he was capable of going a single day without thinking about power tools. He had a good mind for math and science and was also able to apply his creativity in design to his work. I have so much admiration for my father for his strength. He fought so hard when the going was really tough.


Dad opening presents: X-mas 2011

I wish to dedicate this post to my dad. Being my first post on molecular gastronomy, which is the science of cooking (started and cultivated by food tinkerers worldwide) I felt the scientific exploration behind MG accurately captures just the sort of tinkering he’d really appreciate.

 Bird's eye honey wrap


Since buying my molecular gastronomy kits, I’ve responded by either sitting around for hours watching the neat instructional videos and springing into molecular gastronomical action in my kitchen or glaring at the kits in overwhelmed disbelief of the possibilities they possess. In the beginning, I needed to take it slow, so I started with a honey wrap or sheet.

 honey wrap

Many of the gelification techniques in molecular gastronomy use agar agar, which is a gelatinous substance derived from algae and activated when boiled. It has been popular in the vegan/vegetarian movements as a gelatin substitute. It is tasteless, odorless, colourless and very easy to use. It can be ordered online and found at most health food stores.

Here is an instructional video demonstrating how to make a similar sort of sheet out of rum.

Honey Wrap

Ingredients

  • 1/3 cup water
  • ½ cup honey
  • ½ tsp powdered agar agar


honey wrap: you are too sexy

Directions

Place all ingredients in a small pot.

Stirring constantly, bring ingredients to a boil.

Pour contents on plates or in bowls so they make a thin layer. Spread the liquid around on the surface but make sure they’re not too thin as their strength could be compromised. I’d suggest varying the thickness on each surface so you can understand what works best.

Place honey wraps in the fridge for 15-20 minutes. If they aren’t perfectly solid, give your wraps more time to cool.

Cut out a circle shape about the size of your hand from the middle of your wrap. Carefully pull the circle off the surface.

Place yogurt and/or fruit inside your wrap and enjoy.

To dad, from your little girl. Rest in peace.


 223570_10150589644200099_3762516_n

Dark Party

Inspired by the restaurant O.Noir, where one can dine in complete darkness while being waited on by blind servers, I decided to have a party thrown completely in the dark (rightly named Dark Party) about 5 or 6 years ago when I was living in Montreal. Eating is such a sensory experience, and all too often our response to food is overly influenced by sight. Well, this party was meant to challenge that.

I had such an intriguing and giddy experience at O.Noir. When entering the restaurant’s dimly lit lobby, my friends and I ordered our meals, paid in advance and left our bags in a locker. Once our table was ready, our blind server led us into the pitch black dining area. My party and I instantly felt uncomfortable with walking for the fear of falling or hurting ourselves, but had complete faith in our server to lead us to our table. Once seated, we relaxed and had loads of fun. Unable to use our eyes, we automatically just kept them closed and let our other senses take control. We marveled about how interesting it was to watch our sense of smell, taste and touch fill in the space to take over for our lack of sight. I ate with my fingers (by choice) because I felt the need to inspect everything. Also, it was fun trying to identify the ingredients.

Since I’m such an experience junkie, I just had to try this in my own home.

What a proper Dark Party looks like.

The Space:

To begin, decide which areas you’d like your guests to have access to and make the rest of your living space off limits for the evening. Remove fragile or sharp obstacles out of the way; anything that is difficult to maneuver around would be best removed.

Get to know your dining area well: Count the steps of the paths you will need to take ahead of time.Window cover

Door plugUse blankets, heavy cloth or black garbage bags to cover windows, plug cracks around doors to remove as much light from your dining space as possible. Test it out ahead of time. If you can see your hand in front of your face, then it isn’t dark enough. To get the full effect, it would be best if the space were pitch black.

Plan to have a candle or flashlight in your prep area so you can assemble individual plates or platters and one in your bathroom, but make sure the light can’t be seen from the dining area. If you cook all the food yourself, do what you can to have everything prepared, divided and easily distributable before your guests arrive. If you decide to have a potlatch, you’ll be thankful for a small light to help you with assembling as your guests (and the food) arrive.

Inform your guests that they have a time frame of 20 minutes or so to make it to the party. After that, the doors will be closed. Once the lights turn off, they need to stay off. Prepare for any situation you can think of so you don’t have to turn on the lights, therefore enabling the full effect.

The Food:

Find out what foods your guests are allergic to and/or despise and make sure they aren’t on the menu. Map out how many courses you will have and how/when they will be served. Try to have an assortment of flavors and textures to keep your guests guessing and excited. Make sure there are plenty of napkins available, because messy it will get. When collecting plates (recommended between courses) be clear with your guests on whether or not they should keep their silverware.

Prepare an individual portion for each of your guests. For those choosing to have a potlatch, be specific with what dish your guests should bring and how many portions.

Here we are playing pin the tail on the donkey

One mistake I made that I feel is important to note is: don’t forget that your guests can’t see. They have no idea of what is going on, so when you serve your courses, make sure to be extremely clear with what is going on. This will include a lot of talking and explaining on your part.

Examples: “Pass your plates and spoons to the left, but leave your fork.”

“This plate can be passed to Bob.”

“Take one item from this plate and pass it on.”

This clarity was slightly lacking at my Dark Party and created a bit of chaos. My first course was an appetizer that everyone was supposed to take from a plate and pass around. When it came time for the main, guests were to have their own plate but I forgot to explain that well enough. As the main plates were being passed, everyone thought they were supposed to take one thing from that plate. So my guests all ended up with bits of food and no plates. Woops! It was still fun.

Avoid this food: Soup, rice, sticky, syrupy, greasy stuff. You’ll be cleaning for days. No one wants that.

Make this food: wraps, sushi or maki rolls, whole pieces of meat (steak, chicken breast), finger foods and food pockets (samosas, empanadas, pasties, pie pockets, burritos, etc…).

There are many ways to make a Dark Party a memorable night. You’ll probably always look back on it as a night you challenged your senses, bumped into things, made a mess and snuck in some naughty behavior because no one could see you. Ahem.Rice paper wrap

Here are some nice, tidy rice paper wraps that I served for my Dark Party.

Rice Paper Wraps

Rice paper wrap ingredients

Ingredients

  • Spring roll rice paper wraps
  • Rice noodle vermicelli (cooked and drained)
  • One small carrot (julienned)
  • Cucumber (julienned)
  • Avocado (julienned)
  • Squash (summer or winter, previously cooked and julienned)
  • A protein (shrimp, tuna or chicken would work best)
  • Tamari or spicy peanut sauce or any dips or sauces you like, really

Directions

NOTE: Prepare all of the fillings BEFORE you wet the wraps.

Rice paper dip

Once you have everything you want to put in the wrap prepared, take a large bowl and fill it with warm water. Take one (or two for a stronger wrap) and dip it in the water ensuring all parts get wet. TIP: The wrap will continue to soften after you take it out of the water, so take it out while it is still stiff. If you leave it in too long, the strength of the wrap will be compromised and it will most likely fall apart.

wrap

Place the wrap on a plate. In the center, put the ingredients of your choice in small rows. Do not overfill.

Rice paper wrap 2

Carefully pull up the sides of the rice paper and fold inward.

Rice paper wrap 3

Then pull the back over.

Rice paper wrap 4

Tuck any flyaway ingredients back in the center and roll the whole thing towards the front completing the wrap.

Rice paper wrap cut

Dip in your favorite sauce and eat